Tuesday, January 10, 2012

WORKS AT HOME -oil paintings-


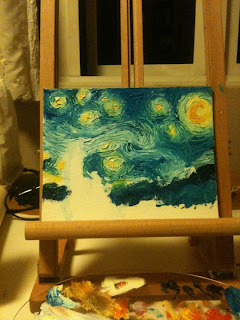
A COPY OF VAN GOGH'S STARRY NIGHT. WORK IN PROGRESS
this is my third try at oil painting. it was really hard to get the 'visible brushstroke' look with a brush... so i used a palatte knife instead!!!! and it worked quite well~~ It was easier to apply a thich layer of paint using a palette knife instead. it took a few days to complete it and there was really a very thick layer of paint on the canvas. i would say this was quite sucessful as i learnt a new technique of oil painting and this was a sucessful experiment. I really love vangogh's starry night and i will do more copies of his works. I do think that it can be of a bigger scale (though it will require a lot of paint!!!!) and i can maybe play around with the colours like making the whlole painting using warm colours instead and see if the atmosphere of the whole painting would change and how it will turn out. I can also use this style to paint another subject matter for a change.
And this is the completed work!!!:

-OIL PAINTING N.O2-

work in progress:

I watched a few tutorials on youtube on how to paint trees using oil paint and i decided to try this technique in my next painting. I used a fan brush to create this texture that was like leaves. I was not familiar with the technique and the paint kind of mixed together and turned into a ugly brown color!!!! D: so i set it to dry so that i can apply a fresh layer on it and suprisingly the texture created by the first layer became a wonderful base for my second layer!!! so i 'skillfully' (>:D) applied a new layer of fresh colours and this was how it turned out!!! i didnt really like the cluster on the right hand side because the edges did not turn out very natural so that is a point for improvement. and after that i filled in the bottom, painting a water body~~ that turned out fine. but i really hated the fact that i drew the floating branches/wood in it. and since i was of a darker color, i could not remove it so i just decided to go with it and tried my best to make it look nicer. However the scale of it could've been bigger. I really liked how the water turned out~~ it looks quite 'watery' to me~ <3
and the reflection turned out quite fine~ though i could have watched a few tutorials online for better ideas for how to do that. this paining is overall not that sucessful as i think the technique was not done quite as well and that the sky could have been painted better and that would really give it a wonderful atmosphere~
i shall explore paintint trees more in the future!!!

DONE!! <3


-OIL PAINTING N.O 1-

WORK IN PROGRESS

This is the background for my first oil painting. I really like the warm and fresh feel of the sillhouette of trees in the afica fields!!! I think it gives out a great atmosphere where the light shines throught the darkness from the faraway horizone.
I also wanted to try out this technique i've seen on Youtube on how to paint trees using a fan brush. i have also taken some reference online as to how trees in africa usually look like where they are very tall and thin, with leaves fanning out like an umbrella at the top. also i tried using materials like linseed oil to make the background smoother but i found out that I really dont like that way of doing it. I'd rather paint a thicker layer as the linseed oil dilutes the paint and it takes away the rich thick colour that the paint has. Hence i will not use linseed oil in my paintings unless i want to achieve that effect.

DONE~

the trees are painted in and i like the painting where it is my first oil painting but i think i could have worked on the composition of the whole painting. i think the trees could have been smaller and that would give a very nice ratio of the sky as to the trees. it would make the painting feel more spacious and create this vast warm sky feel. ^^~

KIMONO AND EXHIBITION

Once upon a time ( sorry i cant remember the date), a group of us went to a student care centre with a mission. And it was to set up an exhibition and also conduct an activity with japan as the theme of our activity.
A lorry was contacted to move out kimonos to the venue for our activity. (THE LORRY RIDE WAS UNFORGETTABLE AN FUNNNNNNNNNNNN despite the heat) although we had alot of trouble setting up the kimonos ( many had holes on it from the setting-up-of-kimono) finally we did it!!! and we went ahead to conduct the lesson/activity. since there were two groups, the other group first taught the student how to fold origami kimonos. then it was our turn!!! we taught the children how to fold the fan using our template. ( it was very hard but with the help of the other group! i love u guys! we did it!!!) then we provided the with oil pastels and color pencils to decorate their fan. Then we taught them how to tie the paper fasteners (pre-modified by us) and we would then stick the paper and the fasteners together. (we did not allow them to do it as we were afraid they might hurt themselves!!!) and this was one of the fans made:

THE FAN WHICH WE TAUGHT THE KIDS THERE TO MAKE FOR THE ACTIVITY

we were really surprised at how the characters of the game 'angry birds' were so popular among them and many were fighting for our phones with reference picture for it. we even drew some of the characters on the white board as a reference for the class. we also split the class into two where half would continue with the activity and the other half will go outside to see our kimono exhibition.


TEACHER OF THE STUDENT CARE CENTRE WHERE WE SET UP OUR EXHIBITION AND CONDUCTED THE ACTIVITY


MAKING OF THE KIMONOS FOR THE EXHIBITION
first i tried many methods of making the flowers. i watched videos online, i've looked at book and many other things on making paper flowers. then i saw this packet of paper flowers in a shop. i bought it and i took one of it apart and that was how i got the idea for making my paper flowers. after making many of them of different sized, i was faced with the problem of coloring it. it was not practial to paint it as it would be time consuming and the weight of the paint would weight the petals down. Getting inspiration from our lovely kim, i sprayed the flowers with paint instead. i mixed the desire color with diluted paint and sprayed the flowers with it. then i repeat that using many different shades and tones to create depth and make the petals stand out. For me, it was not the tedious making of the flowers that was difficult. it was the arrangement of the flowers. I'd have to credit lovely person n.o, our 小黑 for helping me with the arrangement of the flowers. so i glued down the flowers using gluegun. However that was not enough. many class mates commented that the plain white background was not aesthetically pleasing so i decided to paint it. but that did not work well. so i turned to spray paint!! since the flowers were already stuck on, it was very hard to spray the background without coloring the flowers. i had to cover the flowers with newspaper before spraying it. and i have to admit that it did look nicer than before. (YAY!!! >:D)


FINAL PRODUCT
and this is the final producted that was exhibited on that day~

It was very fun making the flowers (well, atleast it was at first before it got tiring) and i really liked the fact that it was quite an interesting idea and that i've decided to go with it. i will like to do more of this kind of works that explores the many different ways of creating things.

LIU KANG PROJECT

This was my first time experimenting with carving and it was quite an enjoyable experience. i did not know that this technique was called relief carving till halfway through the project, i decided to search online on the different types of carving. however among all the different techniques, i still prefered the relief carving. Hence i went ahead to continue with experiments and my final work.
Since the 'theme' of this project was liu kang and many of his work included kampongs in them, i decided to make kampongs as the theme of my work.
i found some pictures online and made a rough sketch on a piece of wood i bought. then i proceeded to carving~~ i finished them off by brushing some pastal dustings on them to give them color and give a better sense of depth in the work.


FINAL PRODUCT!!


i was quite satisfied with this as it really gives a sense of depth and the leaf design on the back which i came up with also looked quite nice. however i could have further defined the foreground and background more, by making them stand out more and defined the forms better.

HaHa This was my first try.. i was still unfamiliar with the techniques and tools so there were quite a number of splinters and it was not as well defined as those above.~ more work could have been done one the coloring too~~~

Here are my board where i did my research on liu kang with the experimentation and the planning


 Overall, i quite enjoy the process of relieve carving though i dont think i will go far with it as i dont have the patience and the ability to see what's 'deeper' than the other. But still, it was great for an experience.


THIS IS KIM!!<3 data-blogger-escaped-and="and" data-blogger-escaped-awesome="awesome" data-blogger-escaped-d:="d:" data-blogger-escaped-her="her" data-blogger-escaped-jealous="jealous" data-blogger-escaped-kimmmm="kimmmm" data-blogger-escaped-lol="lol" data-blogger-escaped-wolverine="wolverine" data-blogger-escaped-work="work">:D HOHOHO

LESSON TIME!!


GUESS WHOOO>:D
'AWESOME!'

LITTLE ACTIVITY WE DID DURING CLASS ONCE UPON A TIME

OLD KALLANG AIRPORT EXHIBITION~

Once upon a day the class went on a trip to visit this exhibition~~ lets explore all the works!!!! (they are all very interesting~